Tuesday, June 19, 2012

Happy Father's Day A Little Late

Well Forker Dads I have to apologize.  I did a post for the Moms, but didn't get to the Dads.  In my defense Father's Day weekend in our house is a two fold event in normal years and this year we have added getting things ready to move and dealing with Realtors and lenders.  Oh, the joy of trying to sell a house and buy another!

Three years ago my husband spent his first Father's Day weekend getting to know his new baby girl.  Our daughter was born just a few day before Father's day, so not only do we celebrate him we also celebrate her.  Which brings me to this weekend.  Between celebrating her birthday, Father;s Day and spending time with our families, we had a blast!

So, unlike Mother's day when I pretty much just had to show up and enjoy the day.  Father's day was spent make sure my husband, father, and daughter had a great day!  We did the traditional backyard barbecue with burgers, brats, and salads.  It is a simple and fun way to spend a Sunday afternoon.

As to the Father's Day gifts.  Well that is not always easy especially for my father!  And then add in that we don't want to really buy much for our house hold until we figure out what stuff we will need for the next house so....  I had to get creative.  I decided I wanted to make something that would mean a lot to both my husband and my father. 

So, I bought two small canvases, let my daughter paint them, added her hand prints, and then affixed stickers to them to create a poem on each.  Covered them with Mod Pog and let them dry.  Both Dads loved the gifts and it will hold special meaning to both of them for years to come!


Grub's On!

Tuesday, June 12, 2012

Fresh Veggies

One of my favorite parts of summer is the abundunce of fresh fruits and vegetables that are availbale at farmers markets and even from my own backyard.  Usually, I plant a large urban garden, but since we are in the process of moving that was not an option this year.

So, in lieu of my usual garden I have planted all my veggies in pots.  I have planted all my favorites, we are even seeing how corn and beans do in pots!  These pots will be easy to move and I don't have to give up the ability to walk out into my yard and pick a fresh cucumber or tomatoe.  I wanted as large of a variety as I could get so I went in on vegetable plants with my parents.  They have  a large garden on our family farm and they allowed me to pick out most of the vegetables for it.  Since they were willing I was able to take just one plant from each type of vegetable that I wanted to plant in pots at my house.  In my pots this year I have tomatoes, peppers, zucchini, cabbage, broccoli, lettuce, corn, and beans. I am looking forward to some great meals later this summer!

I will say that even after I move and have re-established my large urban garden there are still some plants that I will be keeping in pots:
Yup, that is corn growing behind the tomato plant!
  • Tomatoes are the big one.  I have found that it is easier to control them in a pot, plus I can move them when needed if I don't feel that they are getting enough sun.  
  • Lettuce is another.  One of our local stores sells what they call living salad bowls.  These are great and supply me with enough lettuce that I can typically pick from it every couple of days and have few salads each time.  I will probably plant a more of these myself next year and stagger the planting of them so that they are at different stages through the summer and I have more to pick from.  The living salad bowl alone saves me tons of money since we eat a lot of salad and it is one of the easiest pots to care for.  

The other great advantage to pot gardening is that it virtually eliminates weeding making it low maintenance.  Yes every so often a little weed gets into the pots and attempts to grow, but nothing like what can happen with large in the ground gardens.  The biggest thing you have to remember with gardening in pots is to water and water often! The dirt in the pots dries out a lot quicker then the ground does.

So for those who love the convenience and freshness of growing your own veggies, but don't have the time or maybe even the desire to manage a full scale garden I highly recommend gardening in pots.  You pick your favorites and have just one or two plants of each.  Plus, if you have kids this is something fun for them to watch as the plants grown and then produce veggies.  I know my daughter has enjoyed watching the corn and beans grow and if fasinated when we pick the lettuce and then eat it!  I can't wait till all the vegetables really starts to grow!
As you can see I tucked the pots right in my flower beds!

Grub's On!

Tuesday, June 5, 2012

Easy Cheesy Cauliflower


Since I have become a Mom my out look on food has really changed.  I not only try to make sure that I expose my daughter to a large variety of food, but at the same time expand what I eat.  Having grown up in a meat and potatoes household with a low variety of vegetables I have often assumed that I didn't like a lot of them.  As I have grown up and expanded my culinary knowledge I have found out differently.  True there are still those that I do not care for, but I have also learned that just because I do not like a food one way, does not mean that there isn't another way that I would like it!  This is true for me with cauliflower and many other vegetable! Here is one recipe that helped me enjoy cauliflower a little more, and I even got my toddler to eat it too!

Easy Cheesy Cauliflower

1 head cauliflower
½ cup water
½ cup mayo
1 tbs. Dijon Mustard
½ cup shredded cheddar cheese

Remove core of cauliflower and cut into large pieces, place in a microwave safe dish, add water and cover.  Microwave on high for 10 minutes, drain water, and return to dish.

While cauliflower cooks, mix mayo and mustard. 

After you drain the cauliflower, spread the mayo mix over it and then sprinkle with the cheese.

Microwave on high 1-2 minutes or until cheese is melted.

Tip: To ensure that your cauliflower cooks evenly, place the larger piece toward the outside edges of the dish.

Grub's On!

Sunday, June 3, 2012

One Skillet Sunday Morning Breakfast

Bacon, scrambled eggs, and hash browns is one of my favorite breakfasts.  The down fall to this breakfast is that it can dirty two or three pans.  If I am patient I can make my griddle be the only thing I dirty, but it all has to be done in stages, leaving food to cool while other food cooks, and then depending on how many I am cooking for the eggs also have to be cooked in smaller batches. Not necessarily as complicated as I would like to get some mornings, especially Sunday!

Now anyone who is on a diet or trying to watch their fat in take may cringe as I talk about this skillet meal, but this is not a meal that you would make everyday or even every weekend.  This one comes out of my arsenal of recipes every once in a while when I want a low mess, easy and delicious breakfast to feed a crowd.

For 4 people I start with a half pound of bacon chopped up.  Put this in a skillet on medium heat.  Allow the bacon fat to render.  At this point you will be able to see if you have bacon that is going to produce a lot of grease or just a nice amount, if you think it is going to produce a lot pour some out at this point, otherwise leave it alone.  Now add some frozen potatoes to the pan with the bacon.  I usually add about 1 cup just make sure that you don't over crowd the skillet.  Now cook the bacon and potatoes until they reach the desired crispness.  We like our bacon and potatoes crisp so this is the longest part of the process.  As I am typically the first person up I will start this about 20-30 minutes before I expect the rest of the house to wake up.  By taking that into account it allows me to cook them low and slow so that I get a nice golden brown.

While the bacon and potatoes are cooking I will crack 8-9 eggs in a bowl and whisk until nicely blended.  Add a dash of milk, some cheese, and salt & pepper to taste.  Set aside.

Once the bacon and potatoes reach the desired crispness, pour in the eggs and begin to mix it all together and cook the eggs.  It should only take a couple of minutes for the eggs to cook.  Serve hot with toast!

Grub's On!

Saturday, June 2, 2012

The almighty Brat!

Bratwurst, aka: Brats What are they?  A glorified hot dog?  No.  Those over priced, greasy things you can get at the fair with peppers and onions? Yes and no.  A Bratwurst is basically ground pork, mixed with seasonings, put inside a casing, grilled or smoked, and typically eaten on a bun with ketchup, mustard, and relish.  There are many different kinds of bratwurst available, but the traditional one gets the most credit.

I will admit that until recently I would not have put Bratwurst and delicious in the same sentence.  However, that was before my husband introduced me to the wonderful world of sausages, which includes brats. To me brats were chunky, over sized, spicy meat things that held no appeal to me.  What you have to understand is that my husband is of German decent and LOVES bratwursts.  Because of this I really wanted to figure out how I could make him a food he loves and learn to enjoy them myself.  There were two thing became perfectly clear early on; no two brats are the same and some are actually pretty darn good! 

I will admit that it has taken a few years to learn which brats I like and which ones I don't.  This became very apparent to me tonight as we sat down to enjoy the brats that I brought back from Kern's Sausages in Frankenmuth, MI.  As I prepared my brat I was amazed to find that I wanted to try it with just ketchup and relish.  As I took the first bit I found myself enjoying the complex flavors of the brat and the nice accent of the ketchup and relish.  Even just a few years ago this would not have been the case.  Until recently the only brat I would eat was a cheddar brat, smothered and I mean smothered in ranch dressing or if it was available potato salad.  I have found though that if I have a really good brat I don't have to hide the flavors as much.  So, whether you like your brats boiled in beer and then grilled, smoked or just grilled low and slow, make sure to try all different brands and types.  You maybe surprised to find one that you really enjoy! 

My suggestion would be to try Kern's Sausages.  They have a great flavor that doesn't over power, but allows a beautiful symphony to play across your tongue.  If you get the chance to go to Frankenmuth, MI be sure to stop into their store or check out their website http://www.kernssausage.com/ they carry some wonderful products at very reasonable prices!


Grub's on!

Wednesday, May 30, 2012

Banana Brownie Special

During the colder months when most fruits are out of season and just don't taste all that good bananas become a staple in out house.  We can go through a couple a day, but with the warmer months here and so many fruits coming into season they tend to get a little over ripe for my families liking.  And that is where I found myself today, with three bananas that were riper then any of my family cares to eat.

I began to think about what I could do with them.  I did have a fleeting thought that I could peel them, put them in a freezer bag, and freeze them for later use.  I have done this before and it works out beautifully, but this time of year I would rather fill my freezer with other things then bananas.

So,  I starting thinking about what I could make.   I knew that I wanted something really moist and chocolatey.   I began to wondered if I could combine two of my favorite desserts Chocolate Guinness Cake and Chocolate Chip Banana Bread.  This is when Banana Brownie Special was born!

Banana Brownie Special

2 boxes family size Brownie Mix
3 ripe bananas
1 bottle Guinness Beer
2 eggs
Chocolate Chips

Pre-heat oven to 350F.  In a mixing bowl mash your bananas.  Add your eggs, brownie mix, and beer.  Mix till well combined.   Pour your batter into a 9x13 baking pan.  Sprinkle the top with chocolate chips.  Bake for 40-50 minutes or until a toothpick comes our clean.  Enjoy warm with a scoop of ice cream!

Grub's on!


Monday, May 28, 2012

Memorial Day

Growing up I remember Memorial Day marking the beginning of summer.  It seemed like it was the day to start having barbeques, opening the swimming pool, and getting ready for weekends at the cottage.  Now that I am an adult it has taken on even more meaning!  Yes, it still marks the beginning of summer festivities, but it is also a time to honor those who have served and continue to serve our country.  A special thank you goes out to my Dad and Hubby for their service to our country. 

Also, as we honor our countries soldiers, we also need to honor their families.  So often the sacrifices of the families of our soldiers goes unnoticed!  So today I would like to recognize the men and women who stay behind while their soldier goes to war.  To the mothers and fathers who are left to be single parents while their spouse is deployed.  To the women who go through child birth while their spouse is away. To those who keep the home fires burning so that our soldiers have a reason to come back.  And to those families whose soldiers have made the ultimate sacrifice!

I have heard it said that it is often harder on the families of the soldiers then on the soldier themselves when they are deployed.  So as you thank and honor those who have served and those that continue to serve, remember to thank their families as well.  They also sacrifice so that we can live free.

God Bless!

Kim

Friday, May 25, 2012

Re-purposing Leftovers!

At this point in the week you maybe looking in the refridgerator wondering what are you going to do with all those leftovers?  It may have also crossed your mind that you really don't want to have to do a lot of cooking over this holiday weekend, well have I got some ideas for you!  You can take your leftovers add them to a few odds and ends and make meals your weekend meals a breeze.  Here are my top 5 ideas for re-purposing leftovers:

1) Stuffed Braided Crescent Rolls - This is a simple and easy way to use up a multitude of leftovers.  On a cookie sheet lay out your crescent rolls so that the pointed ends are out and all the flat ends meet in the middle.  After that get creative.  If you have taco leftovers layer them in the middle and then braid the dough over the top.  You can do the same with some leftover chicken, veggies, and cheese or even leftover roast beef and carrots with some gravy over top once it is cooked.  Once you stuff and braid the crescent roll, bake for about 15-20 minutes or until golden brown and enjoy! 

2) Leftovers Chili - A lot of leftovers can very simply be converted into a chili without the long simmer times.  Taco meat or even chicken can be the start of a great chili. Take and saute some onions, garlic, peppers, and celery (often you can find celery and onions pre-chopped in the produce section of your grocery store) then add your meat, tomatoes, and beans (for beef chili I use kidney beans, but for chicken I use northern beans).  Taste to see if you want to add any additional seasoning like cumin, chili powder, hot sauce, or taco seasoning and then allow to simmer for 15-20 minutes. I would plan on checking this about half way through just to see how the spices are blending.    Also, if you are feeling adventurous try adding just a little dark chocolate to it.  It helps to deepen the flavor.

3) Soups or Stews - This one is a lot like the chili, but goes outside of the tex-mex flavors.  Left over mashed potatoes, corn, cream/milk, salt and pepper and you have yourself a simple corn chowder.  Some chicken, broth, carrots, celery, and noodles a quick soup.  Take left over roast beef, some frozen mix veggies, barley, gravy and beef broth for another simple soup.  The possibilities are endless.  I once took left over jerk chicken and made a really hearty chicken stew!

4) Meat & Gravy over noodles - This is one of my favorite ways to use up left over roast beef dinner.  I will chop up the roast beef, mix it with gravy, simmer and pour over egg noodles.  If I don't feel I have enough gravy left over I will add a can of cream of mushroom soup.  I have also been known to do this with left over chicken, cream of mushroom soup, and a little milk.

5) Quiches - This is one of the best ways I have found to use up all kinds of leftovers.  Start with a store bought pie crust.  Mix a ratio of 4 eggs to 1 cup cream or milk to make about 1-2 quiches depending on how much mix-ins you add to your pie crust.  The more mix-ins you use the less room you will have for eggs.  I have been know to use leftover ham, chicken, bacon, broccoli, shish-kabobs, spinach, mushrooms, and the list could go on.  Pretty much anything is fair game.  I like to have a good mix of cheese on hand.  Parmesan is good in here as well as colby jack, gruyere, you can pretty much use any good melting cheese that you like.  If you don't want to have a big pie or you want a variety of quiches, muffin tins with a refrigerator biscuit flattened in the bottom also makes a great quiche crust.  For the pie plate you will want to bake them at 350F for about 20-30 minutes or until cook through and golden brown, the muffin should bake at the same temp for 15-25 minutes or again until cooked through and golden brown.  The other great part about these is that you can also freeze them after you have baked and cooled them and bring them out for another time.  Just thaw in the fridge and reheat in the over!

Leftovers can sometimes seem so over whelming and very unappealing, but with a little dash of creativity and courage you can turn those plain old leftovers into a whole new meal!

Grub's On!

Tuesday, May 22, 2012

A taste of Summer

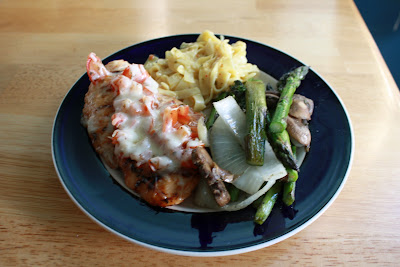
There are times when I make a meal that causes the tastes of summer to floats across my tongue and awaken my tastes buds with anticipation for all the wonderful flavors to come.  There is nothing like farm fresh local vegetables to add an extra zing to our meals!  I made Bruschetta Grilled Chicken for dinner this evening and my taste buds sang in anticipation of great things to come!

Bruschetta Grilled Chicken

4 Boneless Skinless Chicken Breast
1 small bottle Sun Dried Tomato Dressing
2 Tomatoes, seeded and diced
2 tbs. Balsamic Vinaigrette Dressing
1 tsp. dried basil or 3 minced leaves fresh basil
1 cup Shredded Monterey Jack or Mozzarella Cheese

In a ziplock bag place the 4 breast and enough dressing to coat the chicken.  Allow to marinade at least 30 minutes, but no more then 24 hours. 

Just before you are ready to put the chicken on the grill mix the tomatoes, basil, and vinaigrette dressing, allow to marinade. 

Place the chicken on the grill and cook on low heat for about 2-3 minutes on each side.  You just want to get nice grill markets on each side.  Once the chicken has been grilled on each side, move it to the side so that you can place aluminum foil on the grill.  Lightly spray the foil with cooking spray and then place the chicken on it.  On each piece of chicken cover with the tomato mixture and sprinkle with cheese, cook for another 10 minutes or until the chicken is no longer pink inside and the cheese is nicely melted. Serve immediately!

Enjoy!

This was great with noddles and sauteed asparagus.  What a great introduction to the fresh summer vegetables that are on the way!

Grub's On!  

Sunday, May 13, 2012

Mother's Day! A day to honor Mom and family

What a great way to spend Mother's Day!  I spent today honoring those wonderful women that have inspired my life.  I am very blessed to have my not only my own Mother, but also my Mother-in-law and Mama K in my life.  These three wonderful women provide me with great inspiration and advice  both in and out of the kitchen.  All three have shared many of their life experiences with me, in addition to some really wonderful recipes!  Today, we are enjoying a great backyard barbeque, with tons of delicious food!

This tradition of celebrating Mother's Day with both of our families started about 4 years ago when my husband and I invited them all to our house for a barbeque!  My husband and I provide the meat, which is usually steak for Brazilian BBQ, and everyone else brings a dish to pass.  This works out great, because not one Mom has to do all the cooking!

It is on afternoons like this that I am so grateful for our families.  To be able to spend time with our parents and see them spend time with our daughter is wonderful.  There are so many lessons for her to learn while spending time with her grandparents!  She is learning to respect her elders, enjoy life, and value family.  This is also time for our family history to be shared, passed on, and added to!  I couldn't think of a better way to do this then through our parents!

I do finding it interesting how becoming a Mom myself has caused me to value my time with our parents even more.  I think this is because I am now realizing how much of themselves they gave up to raise me and guide me to be the person I am today.  I love being a Mom and want to thank my Mom for doing all that she has for me and my daughter!

My mother is one of the biggest reasons I took the initiative to learn how to cook.  My father is the one that taught me to cook, but my Mother was the inspiration.  She would get frustrated trying to figure out what to do with leftovers and that is when I would help out.  In addition to being my inspiration in the kitchen, she taught me how to garden.  My mother has always taken a lot of pride in how her yard and flowers beds looked.  She was even honored one summer for having the most beautiful yard in our neighborhood, it was really neat!  So, thanks to both my parents not only can I cook the food, but I can grow it as well!

I truly hope that you enjoyed your Mother's Day!  I know that for me I really felt the love today as we honored our Mother's and family today!


Grub's on!

Friday, May 11, 2012

Mexican Night Leftovers?

Taco night has to be one of my favorite meals, however, sometimes the leftovers get to be too much.  How many times in a week am I supposed to eat a taco salad, taco, or burrito for lunch? 

Fortunately, I recently came across a recipe for making taco cupcakes.  As I looked the recipe over, I thought that it could easily be adapted to use up the taco night leftovers that I had, not to mention use up some leftover wonton wrappers as well.  That is when Taco Bites were born.

These little guys went like hot cakes, my nephew downed ten of them all on his own! 

Taco Bites

Ingredients:

1 cup leftover Mexican meat
24 wonton wrappers
1 cup leftover refried beans 
1 cup leftover Spanish rice (optional)
2 cups shredded cheddar cheese
optional toppings: sour cream, diced tomatoes, cilantro, onion, salsa

Directions:

Preheat the oven to 375F. Spray 24 mini-muffin cups with cooking spray.
Place one wonton wrapper in the bottom of each muffin cup.


Layer about 1/2 tbsp of refried beans on top of each wonton.  Top with 1/2 tbsp of taco meat, 1/2 tbsp rice and 1/2 tbsp of shredded cheese. Repeat the layers again with a wonton wrapper, refried beans, taco meat and cheese.

Bake for 15-18 minutes or until golden brown.

Remove the bites from the tin and top with your favorite taco toppings (e.g., sour cream, diced tomatoes, onion, or cilantro) and enjoy!

These were really very good, could be adjusted to use any type of taco fixings you may have on had, and would even make a great appetizer for parties. Especially since you can prepare all of the ingredients ahead of time and then assemble and bake them the day of!

Grub's on!


Thursday, May 10, 2012

Not your traditional Potato Salad

As of late I have been on a mission to try out new recipes. I have a great affection for potato salad, especially one that is chucked full of hard boiled eggs and mayo, but I am trying to watch the amount of fat in my diet. That is when, again thanks to punchfork.com, I stumbled upon a very different type of potato salad recipe on steamykitchen.com. This warm bacon potato salad was a great alternative to a traditional salad and a lot lighter too. It was great accompanied with grilled chicken and sauteed asparagus.

Warm Bacon Potato Salad

Servings: serves 4-6
Prep Time: 10 minutes
Cook Time: 35 minutes

Ingredients:

2 lbs. red potatoes, quartered
2 Tbls. olive oil
8 ounces bacon, cut into 1" pieces
1 clove garlic, minced
1/2 red onion, chopped (I used a Valida onion instead)
1/4 cup red wine vinegar (I used Balsamic vinegar)
1 Tbl. grainy mustard
salt and pepper
1 stalk green onion, chopped (optional or just use for garnish)

Directions:

Preheat the oven to 375F. On a baking sheet, toss the potatoes in olive oil. Roast for 25 minutes or until tender.

Fry bacon for 2 minutes, add the garlic and the red onion. Saute for an additional 3 minutes or until the bacon is crisp.

In a large bowl, whisk together the red wine vinegar, mustard, salt and pepper. Stir in the bacon mixture, then add the roasted potatoes. If you want you can add green onions now or save them to garnish afterwards. Toss gently and serve immediately.

Enjoy!

Grub's On!

Wednesday, May 9, 2012

Checking In...

Hey there Forkers!

I am just wondering if anyone has tried any of the recipes that we have posted thus far or has any suggestions on ones we should try???  Would love to hear your feedback!

Also, wanted to let you know that we now have a twitter account as well, so feel free to follow us there as well!  Kim & Sara @2ChicksNaFork!

Have a great night!

Grub's On!

BBQ Bacon Chicken Bites


It is not uncommon for me to have different types of leftovers in my refrigerator since I attempt to make about 90% of our meals here at home. Due to this I feel like I am always trying to figure out something to do with the leftovers!

Leftover chicken seems to be one of the most common in our house hold.  There are many times that I am looking at it and have no idea what to do.

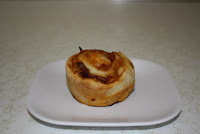
On this occasion I didn't want to make sandwiches or a casserole, on top of that I wanted this to be a quick and easy lunch.  That is when I remembered reading about a recipe that took chicken and buffalo sauce to create a savory cinnamon roll type bite.  As I am not a fan of buffalo chicken I began to wonder what else I could use in place of the buffalo sauce and thought barbeque sauce would be a great replacement.  Then I remembered that I also had some leftover bacon from breakfast and voila, I had these savory BBQ Chicken Bites!

BBQ Bacon Chicken Bites

Prep Time: 10 minutes
Cook Time: 20 minutes
Total Time: 40 minutes
Yield: 18 rolls

Ingredients:
  • 1 roll refrigerator pizza dough
  • 1 1/2 cup left over chicken,  cut into small pieces 
  • 1 cup Bacon
  • 1 cup shredded cheese
  • 1/2 - 3/4 c Barbeque Sauce
Instructions:

In a bowl mix together chicken and all but about 2 tbs. barbeque sauce.

Preheat oven to 400 degrees.  Prepare a baking sheet or muffin tins with parchment paper or non-stick spray.  (I used muffin tins)

Divide dough in half, roll each half into large rectangle roughly 1/4 inch in thickness.  Spread the barbeque sauce over each half, sprinkle chicken, bacon, and cheese evenly across each piece of rolled out dough.
Starting from long side of dough, begin rolling the dough up like a cinnamon roll. Pinch ends when done. Slice into 1 1/2 to 2 inch rolls. Place on the baking sheet or in muffin tins.


Bake for 15-20 minutes, or until cheese is bubbling and dough is lightly browned. Serve and enjoy!


These were great dipped in ranch dressing or on their own and were really simple to make.  As we were enjoying them, my husband said that they could be very versatile.  If you are not a barbeque sauce fan, like him, you could do Mexican bites (refried beans, cheese, taco sauce, and meat), pizza bites (pizza sauce, cheese, and meat and/or veggies), the possibilities are endless! Hope you enjoy these as much as my family did!


Grub's on! - Kim

Tuesday, May 8, 2012

Double Chocolate Pumpkin Cake with Pumpkin Spice Buttercream

The night that I created the post about Punchfork.com, I decided that I needed to find some recipes on there and make them.  This was very fitting as I was in search of some really good dessert recipes for a cake auction.   During my search I found delicious looking loaf cake on Picky-Palate blog at picky-palate.com.  I have to say this was an extremely easy cake to make and is one of the best I have made in a while.  I was actually sad to see them go and then one I did keep only lasted about 24 hours in our house!

If you are worried about the pumpkin flavor, in the cake you can not taste it and as for the frosting a simple can of cream cheese frosting or none at all would taste just as good!

Double Chocolate Pumpkin Cake w/ Pumpkin Spice Buttercream Frosting

Cake Batter
1 box devils food cake mix
1 small box instant chocolate pudding
1 stick butter, melted or 1/2 c oil
1/2 cup buttermilk or milk ( I completely forgot to add this and it turned out great!)
4 large eggs
1/2 cup sour cream
15 ounce can pumpkin (reserving 2 Tablespoons for buttercream)
2 cups semi-sweet chocolate chips

Pumpkin Spice Buttercream Frosting

2 sticks unsalted butter, softened
2 tablespoons reserved pumpkin
1/4 teaspoon ground cinnamon
4 to 5 cups powdered sugar
2 to 4 tablespoons milk

1. Preheat oven to 350F. Spray two 9×5 inch bread pans, 24 cupcake tins, 9x13 cake pan, or 2 9 inch cake rounds with non-stick cooking spray. 

2. Mix together cake mix, pudding mix, oil, buttermilk/milk, eggs, sour cream, pumpkin, and chocolate chips.  Mix all until well combined. Divide cake batter evenly into prepared pans. Bake for bread pans for 55-60 minutes or until cooked through. (24 cupcakes, bake 15-20 minutes; two 9 inch cakes rounds or 9x13 cake pan, approximate bake time is 30 minutes check often after.

3. For buttercream frosting, mix butter, reserved 2 tablespoons pumpkin and cinnamon on high until well combined. Slowly add the powdered sugar until thick and creamy.  Add milk until buttercream has a nice consistency. Frost over cooled cakes, slice and serve.


Grub's on!

Friday, May 4, 2012

Oriental Marinade

Marinades are one of those great kitchen weapons that can help spruce up a plain old piece of chicken or add more depth to a cut of red meat.  However, when it came to fish I was pretty much at a loss for what marinades to use.

With all the hype about getting more Omega3's in our diets I wanted to add more fish.  Unfortunately, fried fish was pretty much all I knew and not really the best option!   Thus began my hunt for a good fish marinade.  Fortunately, after only a small search I found one that is great for grilled or broiled salmon.  The best part, it is a hit not only with my husband, but also my 3 year old daughter!

For this one I did saute some small shrimp and toss them with the sauce.
This is a very quick and easy marinade, it take about 10 minutes to put together and then you just let the salmon marinade for at least 4 hours, but no more then 24. 


Ingredients:
2 inches fresh ginger, finally chopped or grated
2/3 c Rice Wine Vinegar
3/4 c Kecap Manis (Sweet Soy Sauce)
1/2 tsp. Chinese 5 Spice powder

Mix all ingredients in a bowl add your fish and wait.  When ready place on a hot grill or broiler pan and cook to desired doneness, keep about 1/3 of the marinade to bast.  The remaining 2/3 bring to a boil in a small sauce pan,  reduce heat, and simmer till it reduced by about half.  This sauce is great to drizzle over your final product.

We like to put our on a bed of udon noddles with some lightly sauteed baby bok choy and then pour some of the sauce over top.

If you are not a fan of fish this marinade also works great with chicken and shrimp, just reduce the marinade time!  I would say at least 30 minutes, but not much more then 10 hours.

Grub's On! - Kim

Thursday, May 3, 2012

Something Sweet after a Fun Day!

What a blessing today was!  We had some beautiful weather, the sun was shining and the temperature soared!  My daughter and I enjoyed lunch with my niece, then headed to my 2 Chicks partner, Sara's, house to enjoy some pool side fun.

After fun in the sun and some grilled hot dogs we headed to home.  After we settled in for the night, I thought a fun and easy dessert was in order after the activities of the day, so we enjoyed a simple dessert that is easy and delicious.

I created this because I wanted a dessert that would tame my sweet tooth, but not leave a ton of leftovers in the house.  In my freezer I keep rolls of cookie dough and I thought....  Yum... Hot Cookie Sundaes!

So, I preheated my oven to 350 degrees.  Using a serrated knife I cut three 1 inch slices off the frozen cookie dough. (One for each of us!)  I put each cookie slice into a lightly grease ramekin then baked them for 9-12 minutes ( I baked ours for about 10 minutes, but we like our cookies doughy.  If you want them crispy bake them a little longer).  Allow the cookies to cool slightly, basically I wanted the ramekins cool enough to touch, but the cookie still nice and warm.  Once they cooled we put a scoop or two of our favorite ice cream on top then added chocolate sauce/hot fudge, whipped cream, and a cherry.

The completed goodness!

These little treats were a delicious end to a great day! AND no leftovers to tempt me late in the night!


Grub's on! - Kim

Wednesday, May 2, 2012

PunchFork, Have you heard of it?

Every cook has their standard arsenal of recipes.  Those tried and true recipes that are easy and work in a pinch.  I have a handful of them and use them often, but there are those times that I just want to try something different or be more adventurous.  This is where the website punchfork.com .com is a great tool.

Punchfork links to other blogs and websites that are posting recipes with pictures.  When you get to this page it is filled with so many wonderful pictures of food, you want to try them all.    There are dinners, breakfasts, desserts, drinks, side dishes.  You name it and you will probably find it on the page.

In addition to being able to view the recipes and visit the other blogs that are linked to this site, you can sign-up and create a virtual recipe box.  I enjoy scrolling through the pages and adding to my recipe box.   It is such a fun and delicious site!

 Check it out, see what fun recipes you can make, and let us know about any that you try!

Grubs on! - Kim


Friday, April 27, 2012

A Planter of Possibilites!


I planted this pot this morning. It contains oregano, thyme, sage, rosemary, and a pansy. Did you know that the pansy is an edible flower, and makes a beautiful garninsh. They can even be candied and look dainty and pretty on cakes or cupcakes. Why not make some candied pansy cupcakes for Mom this Mother's day? You could use everything here to create your own culinary delight. Fork on!

#eatdrinknamaste
Sara

Thursday, April 26, 2012

Cheese-Stuffed Chicken & Melted Strawberries

As the trees have started to turn green and the spring flowers have sprung it appears that the growing season is upon us.  It is with great anticipation that I look forward to locally grown produce, farmers markets, and just plan fresher produce!  The less time my food has to spend on a truck the better.  In anticipation of fresh picked strawberries and other great fruits that grow during Michigan springs and summers I have started to think about all the great recipes that I will be trying our!

So, in honor of the coming Strawberry season here is a great recipe for you!


Cheese-Stuffed Chicken and Melted Strawberries
From: Better Homes and Gardens
Serves: 6

3 c. fresh strawberries (halve & quarter big berries)
2 T. white balsamic vinegar (or white wine vinegar)
1/4 c. strawberry jam
6 skinless, boneless chicken breast halves (about 3lb.)
3 oz. Parmesan or while cheddar cheese (we used Dubliner Irish Cheese)
 large fresh basil leaves
2 cloves garlic, minced
snipped fresh basil

Preheat oven to 400 degree.  In a 3-quart lightly greased baking dish combine berries, jam, and vinegar.

Take each chicken breast and cut a slit in each breast to create a pocket.  Take your cheese and cut into 3 x 1/2 inch piece, wrap with a basil leaf and stuff into the chicken.  Seal the pocket opening of each breast with a wooden toothpick or spear.  Sprinkle with salt and pepper.

In an oven safe 12-inch skillet cook heat oil over medium heat then add the garlic.  Saute till aromatic then brown 5 minutes on each side.  Transfer to over.  Bake uncovered for 5 minutes.  Add the strawberry baking dish to the oven and bake both for 10-15 minutes until chicken is cooked through.  Serve chicken with melted strawberries and sprinkle with basil. Great side dishes with this is steamed broccoli and rice!


Grubs on! - Kim

Wednesday, April 25, 2012

Jerky Yumminess!

When I was growing up my family would make trips north to our cabins. We had one in Oak Beach, MI and another in Atlanta, MI.  During these trips north we would always stop at the country markets along the way and get some beef jerky.  I can remember munching on this stuff as a kid and loving it!  To this day nothing beats one of those wonderful sticks of smoky goodness!  As an adult I continue to have a great love for jerky, though now it has expanded to turkey, elk, venison, and buffalo jerky.  Not to mention hunter sausages and even summer sausage.  Smoked meat just can't be beat.

Now, I started young with my love of jerky goodness, but who would have thought I would have married into a family that made and sold the stuff?   My Mother-in-law runs a great little fish market called Mariner Market in Omer, MI (the smallest city in MI) and my Father-in-law is German.  Between the two of them, they have helped to further nurture my love of smoked meats!

Whenever we come up to spend time with my Mother-in-law, we also get to spend time at Mariner Market where we get to sample the many varieties of jerky she has.  As a kid I remember there just being original beef jerky or original turkey jerky.  But when I walked into the market for the first time I was shocked to see the variety.  The market has Teriyaki, Cherry Maple, Honey BBQ, Spicy, and Hickory Smoked in both turkey and beef.  Then they also have Buffalo, Elk, and Venison (both original and spicy).  It is a jerky lovers dream.

In addition to all the wonderful Jerky, Mariner Market also carries smoked fish, frozen fish, and Mariner's special breading.  It is great to be able to head north and know that I will be able to get my fix of jerky.  If you get the chance to head towards Omer, MI I highly recommend a stop at Mariner Market, especially if you love Jerky as much as I do!

Grubs on! - Kim

Monday, April 23, 2012

Life Lessons in the Kitchen!


My Dad, the man that taught me to cook and so much more!
When I was growing up time spent in the kitchen with my Dad was like going out and tossing the ball around! The kitchen is our special place.  That place where my Dad and I completely connect. I have so many great memories of cooking with my Dad.  One of the best memories was weekend mornings at our cabin.

My family back in the day!
As the youngest of four kids, with the closet sibling in age 9 years older then me, it wasn't uncommon for me to be the first kid up in the morning.  This worked to my advantage as my Dad was also an earlier riser.  So, by waking up early, I would get to spend some quality time with him in the kitchen.  He not only gave me his undivided attention, but also taught me his love of cooking.  On those weekend morning we would get the griddle out, start frying bacon and mix up his very special pancake recipe!   My Dad's pancakes were, and still are, the best around! 

As a child, I remember thinking how magical my Dad's cooking was, especially the pancakes!  I soon learned that making delicious food is not magical, but fun, relaxing, and filled to the brim with love!  My Dad taught me how to make cookies, cakes, breakfast, stir fry, you name it he either taught me how to make it or supplied me with the tools I needed to figure it out!  He not only taught me to cook, but canning as well.  We would can pickles, tomatoes, jelly, and jams.  Dad taught me so many great lessons in our kitchen.  He taught me patience, perseverance, the importance of working as a team, and the taste of love! 

Dad & I cooking Thanksgiving Dinner!

It is amazing to me how adding a dash of love to everything you do can make whatever it is extra special.  There have been days when cooking meals I have been mad or just disinterested and on those days I can pretty much guarantee that I forgot to add that little dash of love.  Granted sometimes I get lucky and the meal still manages to turn out passable, but I am finding that if I don't take the time to recharge my cooking mojo, the dash of love can come up missing in my cooking.  I mentioned this to some of my friends and one of them, who is an ex-culinary instructor and former culinary tutor of mine, said that this happens to the best of chefs.  We spend so much time in life cooking and eating that we can get burned out.  He suggested that I try a new cuisine or something very traditional to help recharge.  So, tonight I am taking his advice, I am going to make this Mexican meal that includes a taco sauce that took me about 3 years to perfect.  I will get my cooking mojo back.  I also plan on seeing my Dad and getting into the kitchen with him.  That quality time with him helps me remember where my love of cooking is from and recharges the mojo! 

In the end the kitchen, food, and cooking is not the only place that a dash of love can make so much of a difference!  It is amazing the lessons that can be learned in the kitchen, lessons that go beyond the kitchen, lessons that I plan on passing on to my children!  It is possible that they won't all like cooking as much as my Dad and I do, but the lessons learned in the process and wonderful memories made can touch your life long after the meal has been eaten!


So don't forget to add that dash of love to your cooking, your life, and all you do, it can take any meal or event up a notch!

Grubs on!  - Kim

Sunday, April 22, 2012

Ann Arbor the "plate"!


Wow, what can I say? You know, there are many hidden gems just a stone's throw away from us here in Michigan, which offer lovely jaunts to little corners of the state. We found our own little corner of culinary bliss, right in Ann Arbor.
We decided to do the Zingerman's food tour. It is a great concept, and for a worthy cause. The idea is, that you visit 5 Zingerman's businesses, get your tour page signed off at each one, and once complete, the page is worth $5, per tour participant, toward a local food bank charity. Since there were 5 of us that relished in this experience, $25 went to the local food bank, courtesy of Zingerman's. This meant that we did our part in helping provide 25 meals to those in need.
I am a huge advocate of whole foods. Zingerman's uses nothing but. From stem to stern, this business is all about using the finest ingredients, and I am here to say, that the proof is literally in the pudding. My palate was dancing yesterday, and after a day spent on a "Zingerman's crawl", I slept with more than visions of sugar plums dancing in my head. Wow!
We started our tour at Zingerman's Coffee company, where we had a great cup of freshly brewed Indian Mysore. Talk about a cuppa joe! When paired with one of their savory cheddar herb scones, or an apricot palmier, you have a treat that is a great start.
Now let me add, that the Coffee company, the Creamery, and the Bakehouse are all in the same location, so the "crawl" is best started there- ;)
Next we wandered into the Creamery. Now, if you love cheese, this is probably likely to make you feel like you might rub elbows with St. Peter or St. Paul upon entry... you may even hear angelic chords as you open the doors and see the beautiful display of cheeses, as you enter. In other words, albeit just a small place, it is a cheese lover's heaven. One of the many things I love about Zingerman's, is the genuine excitement and knowledge the employees have for the products they sell. They are eager to let you sample goods, and will teach and tell you anything you want to know about them. We got to sample, and ended up taking home some amazing mozzarella, fresh from soaking in brine, as well as the famous Pimento cheese spread, and the kids tried some of their delicious gelato.
Once we were finished at the creamery, we mooooooved (had to) on to the Bakehouse. This is where some of Zimmerman's most famous products come from. It was a delight for all 5 senses. Beautiful breads on display, smells that I can't begin to justify with words, and tastes that made me feel totally wrong for enjoying myself so much in a public setting. We tried a chocolate cake that was absolutely amazing, and a cookie that very much deserved it's name, "The 'O' cookie". With it's oatmeal raisin chocolate goodness, I had a moment almost as good as the one Sally had with Harry in the diner scene. (you all know the movie reference there) From the Bakehouse, I brought home a loaf of their world famous rye bread.
We next headed to Detroit street, in the Kerrytown district of Ann Arbor, to the famous Zingerman's Deli. If you appreciate the beauty of the display cases in a cute little vintage deli setting, this my friends, is where you find your pearly gates. Upon entry, the aroma captivates you, and friendly staff members are readily available to take your order, answer any questions, or encourage you to sample anything that you see that looks yummy. I ordered the classic Ruben sandwich, and it was divine. Paired with a crunchy, zesty pickle, and a spicy ginger ale, it was quite possibly the best, yet simplest sandwich I have had in a long time. And it is true, the rye is the world's greatest.
Last but not least, on the tour, is Zingerman's Roadhouse. Friends, this place is fantastic. But, because of it's rating on the fantastic scale, you need to make reservations. We couldn't get in for dinner, (hence why we ate at the deli instead), but we had them sign our sheet, and completed the tour there anyway. I have eaten here in past visits to Ann Arbor, and I can say that it is one of my favorite places to go for a nice meal. Now... talk about farm to fork! The head chef here, Alex Young, is also the head of the enterprise, Cornman Farms, a local, organic farm, which is the main supplier for all Zingerman's eateries. I will blog further about the Roadhouse the next time I visit... But if you are near Westgate in Ann Arbor, call in a reservation... You will be glad you did.
I highly recommend the trip to Ann Arbor to experience all that Zingerman's has to offer. It is truly a delight, that will leave your memory bank and belly full, and your trunk full of goodies to enjoy at home. From farm to fork, from tongue to tummy, this tour is sure to satisfy.
Fork on!
Sara
#eatdrinknamaste
There is nothing better on a weekend morning, than having Billie Holiday crooning through our speakers, coffee aroma filling the air, the fireplace chilling nippy toes and BACON in the oven! I have made some treats for breakfast this morning! Happy Sunday everyone!

Saturday, April 21, 2012

Ann Arbor Day! Losen the belt folks!

Alright Forkers!!! I (Sara) am heading to Ann Arbor, with the fam, to do a tour of all of the Zingermann's delights... starting with the Creamery. We hope to go to the bakery also, and finish up with an amazing meal at the Roadhouse. Post to folow! Fork on! #eatdrinknamaste -Sara

Sick Husband, two year old, and you want what for dinner???


Yup, that is right!  I got a sick hubby at home.  Now don’t get me wrong, I don’t like that he doesn’t feel good and I am one of those wives who dotes on their husband.  Just ask Sara she will tell you that my hubby is spoiled!

But tell me how am I supposed to take care of him when all he wants to eat is cereal.  Yes, that is right, cereal.  Here he is, sick, with a wife that is willing to make him homemade, from scratch, chicken noodle soup. Not from concentrate canned soup, but the kind that sits on the stove all day simmering and making the house smell lovely.  Not only is the base made from scratch, but so are the noodles! 

Now lets think about this, not only is the nutritional value of cereal equal to that of cardboard, but passing up home cooked goodness is like saying no to a free glass of dom perignon for a glass of bud light!

Needless to say, I did get him his cereal.  However, the Mom in me made him a fruit smoothey and made sure he ate his leafy greens and fruits.  And he is on the mend!

Now after all this talk of Chicken Soup, you maybe wondering where is the soup?  Well here it is, my favorite chicken soup recipe:

1 Rotisserie Chicken, 3 chicken breast, or 1 whole raw chicken (this all depends on the amount of work you want to do!)
1 tbl. Olive oil
1 large onion
1 clove garlic, minced
5 whole carrots, chopped (I like to cut them into half rounds)
1 celery heart, chopped
1 recipe noodles (see below for recipe) or 2 cups noodles of your choice
5-8 cup chicken broth
1 bay leaf
Salt & Pepper to taste

In a large stockpot warm up oil, add garlic and sauté till fragrant, add onions and cook till translucent.

If you use raw chicken you will add it and the chicken broth to the pot with the garlic and onions.  Add the bay leaf and pepper.  Simmer until cooked through.  Once the chicken is cooked, remove from broth and cool before chopping up.

If you use a rotisserie chicken, debone and chop.

Add the vegetable to the broth.  Simmer till vegetables are tender then add the chicken and the noodles.  Simmer for an additional 15 – 20 minutes or until noodles are cooked.  Serve immediately!

Noodle Recipe

2 cups flour
¾ tsp salt
1 egg
1/3 to ½ cup milk

Combine all ingredients in a bowl until it forms a soft sticky dough.   Lightly flour the counter and roll out to 1/8 “ thickness. Cut into noodle pieces, we like our about 1” x 2”.

These are a great addition to this soup.

Grubs on! - Kim

Friday, April 20, 2012

We made it!

That is right Forkers!  We exceeded 30 facebook likes! We actually made it all the way to 64 likes as of 10:45 p.m. this evening!  In honor of the great response we celebrated with some fun in the kitchen.  Sara and I spent the evening in the kitchen cooking up food.  Here are all the ingredients that we used.

We made steak salad wantons, shrimp cocktail, guacamole, and dirt cake.  Everything turned out great.
 

We had some great laughs and will be posting some great video soon!  Thank you everyone for liking our page!

Grubs on! - Kim